
Introduction
There are a few famous software monitor systems, and Zabbix (wikipedia) is one of them. Zabbix is an enterprise-class open source software for monitoring of servers, networks, and applications.You can compare Zabbix with any other multi-agent monitor systems and decide which one is suitable for you. We will focus on Zabbix on Ubuntu today.
At this guide, we will setup two machines. Both machines are Ubuntu 12.04 LTS. Most guides on the internet are installed with Apache/MySQL. We will setup with Nginx/Percona as example.
We will install the server machine first (on a Linode), and then the agent machine (on an AWS EC2). (You can do the same works on a Digital Ocean Droplet.
1. Setup Zabbix Server (on a Linode)
Let's say this Zabbix Server is named "Tokyo01" which is located at Linode Tokyo. Before installing Zabbix server, we have installed Nginx and Percona already.First we add a PPA to get the most up-to-date Zabbix packages:
(You can use nano or any other editor to replace vim here.)
sudo vim /etc/apt/sources.list
Add these lines at the bottom of the file:
# Zabbix Application PPA
deb http://ppa.launchpad.net/tbfr/zabbix/ubuntu precise main
deb-src http://ppa.launchpad.net/tbfr/zabbix/ubuntu precise main
Save and close the file (sources.list).
Add the PPA's key to make apt-get knows the source:
sudo apt-key adv --keyserver keyserver.ubuntu.com --recv-keys C407E17D5F76A32B
Now, it's time to update:
sudo apt-get update
Good job. All above are the same works that we will do again on the Zabbix Agent machine later (also in the future). Next, we will still focus on Zabbix Server setup steps:
sudo apt-get install zabbix-server-mysql zabbix-frontend-php
System may ask you for the MySQL root's password during the installation process.
1.1 MySQL Configuration
Once you finished the package installation, next we can start the configurations.
sudo vim /etc/zabbix/zabbix_server.conf
Find and update at least these three parameters:
DBName=zabbix
DBUser=zabbix
DBPassword=Random.Your.Password.Here
Save and close the file.
Create one MySQL database and one MySQL user with the same password you just saved in /etc/zabbix/zabbix_server.conf .
Then we're going to import the SQL files:
cd /usr/share/zabbix-server-mysql/
sudo gunzip *.gz
mysql -u zabbix -p zabbix < schema.sql
mysql -u zabbix -p zabbix < images.sql
mysql -u zabbix -p zabbix < data.sql
Yes. Please type the same password of the MySQL user "zabbix" you just choosed.
1.2 PHP Configuration
We need to modify php.ini for letting PHP process our monitor data smoothly. The part of "{your configuration}" could be "apache2" (if you use apache), "cgi" or "fpm", "cli" depends on your PHP environment. At this guide, we will setup nginx to use fastcgi later, we will edit /etc/php5/cgi/php.ini .
sudo vim /etc/php5/{your configuration}/php.ini
Search and modify these parameters within your php.ini:
post_max_size = 16M
max_execution_time = 300
max_input_time = 300
date.timezone = UTC
Save and close the file.
Then, we can have a copy from Zabbix for PHP configuration, and edit it:
sudo cp /usr/share/doc/zabbix-frontend-php/examples/zabbix.conf.php.example /etc/zabbix/zabbix.conf.php
sudo vim /etc/zabbix/zabbix.conf.php
Find and modify the parameters to fit your situation:
$DB["DATABASE"]                 = 'zabbix';
$DB["USER"]                     = 'zabbix';
$DB["PASSWORD"]                 = 'Your.Password.Here';
Save and close it.
Good. We have two more files to go.
Restart the PHP if need.
service php-fastcgi restart
1.3 Nginx Configuration
Here is my nginx site configuration file that you can reference, and save as /etc/nginx/sites-available/monitor :
server {
    listen 80;

    # change these three lines to fit your site
    server_name monitor.example.com;
    access_log /srv/www/logs/monitor/naccess.log;
    error_log /srv/www/logs/monitor/nerror.log;

    root /usr/share/zabbix;

    # if you want to limit specific IP
    #allow type.your.IP.here;
    #deny all;

    location / {

            if ($scheme ~ ^http:){
                rewrite ^(.*)$  https://$host$1 permanent;
            }
            index                   index.php;
            error_page              403 404 502 503 504  /zabbix/index.php;

            location ~ \.php$ {
                    if (!-f $request_filename) { return 404; }
                    expires                 epoch;
                    include                 /etc/nginx/fastcgi_params;
                    fastcgi_index   index.php;
                    fastcgi_pass  127.0.0.1:9000;
                    fastcgi_param SCRIPT_FILENAME /usr/share/zabbix/$fastcgi_script_name;
        }

            location ~ \.(jpg|jpeg|gif|png|ico)$ {
                    access_log      off;
                    expires         33d;
            }

    }
Once you done it, make sure to enable this site (replace the filename "monitor" to yours):
cd /etc/nginx/sites-enabled/
ln -s ../sites-available/monitor monitor
service nginx restart
Finally, we have one more file to edit, and ready to run!
1.4 Start the Zabbix Server
Let's take a look at Zabbix init file:
sudo vim /etc/default/zabbix-server
Find this and say "yes":
START=yes
Save and close this file, and we are ready to start Zabbix server now:
sudo service zabbix-server start
2. The First Time Login
If everything goes correct, you can open the browser and link to the IP or url you set in nginx site, and see this:(In our example site configuration file, it would be "http://monitor.example.com/" )

Enter this default set to login:
Username = admin
Password = zabbix
Please make sure to change your admin's password once you get in. (Please).
3. Setup Zabbix Agent on the Same Machine with Zabbix Server (on a Linode)
3.1 Install Zabbix Agent
It's always easier to have a monitor agent on the same machine where installed with monitor server. We will not meet any port, firewall related issues and make sure our monitor system runs well.
We are on the same machine, therefore we don't need to process steps 1.0 to setup PPA and apt-get update again. We can install zabbix agent package now:
sudo apt-get install zabbix-agent
Once finished the installation, we can edit the agent configuration file:
vim /etc/zabbix/zabbix_agentd.conf
Find and edit these three parameters:
(Choose your Hostname in your case. We use "Tokyo01" at this guide.)
Server=127.0.0.1
ServerActive=127.0.0.1
Hostname=Tokyo01
Save and close it.
Done and ready to go.
sudo service zabbix-agent restart
3.2 Configuration Hosts
Get back to our browser interface (http://monitor.example.com). Go to "Configuration" --> "Hosts" --> "Zabbix Server" (or your Hostname):
Move the "Linux servers" from the right-hand side box to the left-hand side.
At the bottom, change the "Status" to be "Monitored".
Click "Save'.
(Wait for a couple seconds.)
Go to the page: "Monitoring" --> "Latest data"

--> find a item that you're interested in --> click on "Graph" to see its chart.

4. Setup Zabbix Agent on Another Machine (on an AWS EC2)
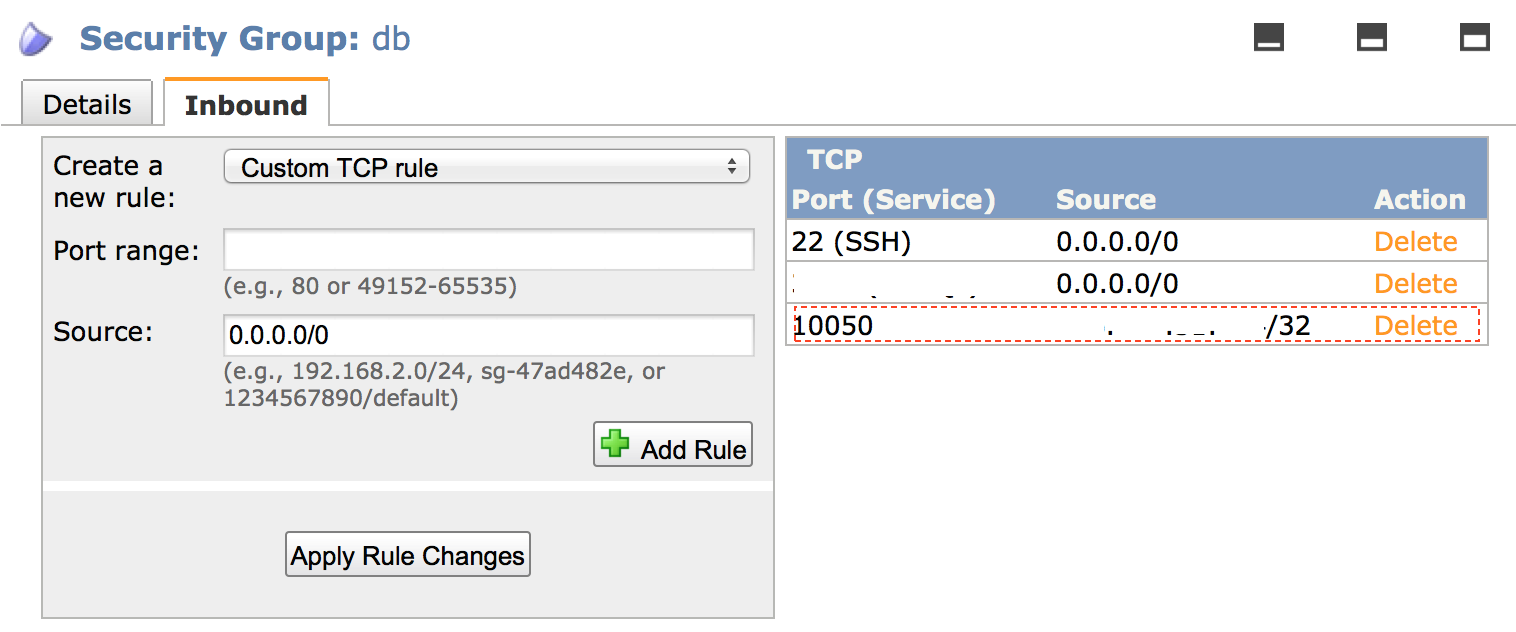
At this guide, we didn't modify the Zabbix working port numbers. We will keep it, and show you how to do the setup if your Zabbix agent machines are located within AWS data centers.You can either use AWS Management Console or AWS CLI to modify your EC2 Security Group.
Make sure you choose the correct "Region" before your any operation.
Add one Inbound port "10050" with a specific IP of your Zabbix Server at "Source" field (format: "xxx.yyy.zzz.mmm/32". (You should not use "0.0.0.0/0" except you want to share with everyone.)
Once you set the security group done, you can follow the steps 3.0~3.2 to install Zabbix Agent.
5. Follow-ups, and More
Next we are going to monitor Percona/MySQL servers, Nginx servers, and more :-)You can also find some reference at Zabbix documents: https://www.zabbix.com/documentation/doku.php?id=2.2/manual
---
This guide has tested on: Linode, Digital Ocean, and AWS.
0 Comments:
Post a Comment